The FI+Z (Focus, Iris & Zoom) lens control system is a precise controller for the complete array of lens functions. The comfortable HU3 Hand Unit gives focus pullers not only a robust and reliable unit, but one whose controls also equip the focus puller to smoothly translate the changing actors' positions on set to a precise movement of the focus knob. A Micro Force splits off the zoom control, while the iris slider uses a unique non contact technology to eliminate the opening required for a conventional sliding seal.
Kit includes:
- Preston FI+Z Transceiver w/ mounting bracketry.
- Preston Hand Unit w/ Focus, Iris, Zoom and Camera Run functions.
- x3 Digital Motors w/ bracketry and cables.
- Command, Camera and Power cables
Also Available:
Additional FX Module for use with the FI+Z to create in-camera effects such as speed ramping and record/playback of FI+Z commands.
Key Features
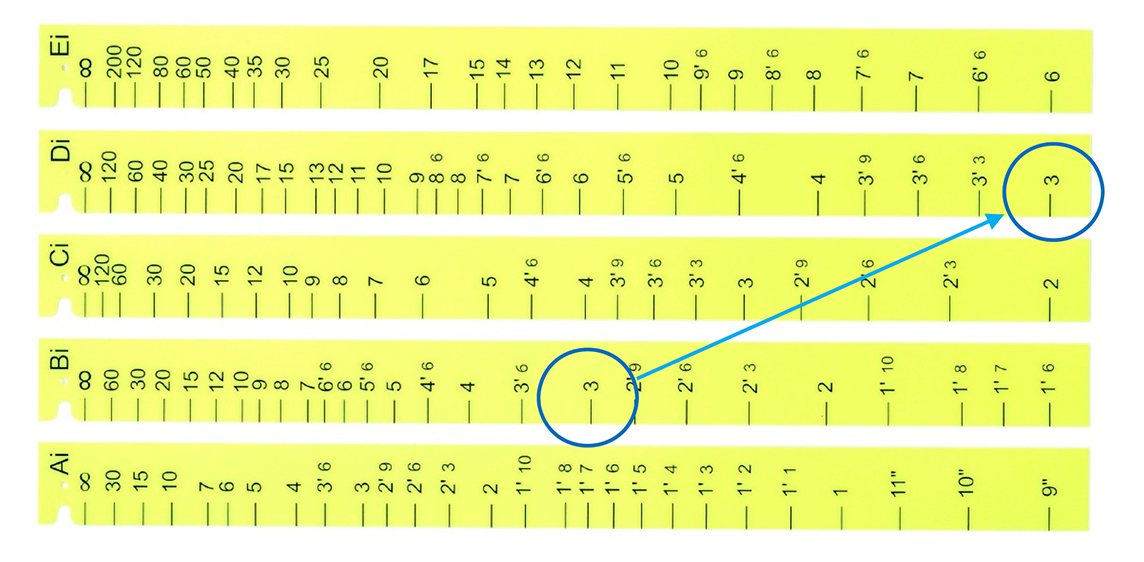
- Lens Mapping software matches the focus distance marks of a lens to the pre-printed focus marking rings. Five focus rings, labeled Ai – Ei (Imperial), cover focus distances from 9"
to 6'
- A bright, sharp, OLED display shows camera, lens, and hand unit set-up status.
- Focus distance settings can be displayed digitally for Cooke i-Lenses, or any lens which has been
calibrated to the unit.
- Data from compatible ultrasonic measuring devices like the Cinetape
can be displayed.
Getting Started
-
I. Set-up the Motor driver (MDR3) and Digital Motors.
- Slide the motor brackets onto the matte box support rods. Position the motors and
brackets so that the motor gears mesh with the corresponding lens gears. Couple
the lens motors to the lens gears. Adjust the motors to have minimum backlash and
tighten the handles of the motor brackets. Do not couple the motor to the lens too
tightly or binding will result. Check that the motor brackets do not flex or slip on the
mattebox support rods. For normal lenses, the torque adjustment switches can be
set in the middle position of their range. Connect the motor cables from the motors
to the MDR3.
- Use the designated camera cable to connect the MDR3 to the camera accessory
receptacle. Connect the power cable from the
MDR to the camera or battery power receptacle. Important: check that camera is
capable of supplying sufficient current for the MDR3.
- Apply power to the MDR3. Press the reset button. The motors will calibrate
themselves to the mechanical span of the lens rings.
- Select the MDR wireless channel with the channel selection on the top cover or side.
-
II. Hand Unit (HU3) Set-up
- Install the FM50/FM500H battery.
- Press the Power Switch momentarily. The main display screen will appear.
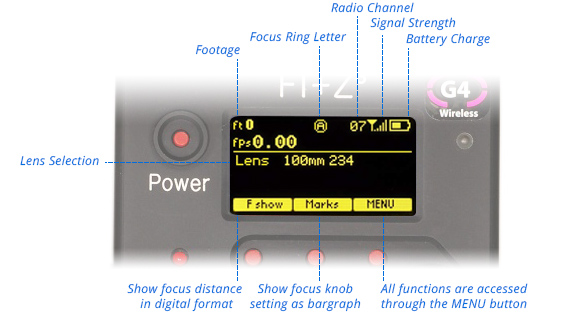
- If the ft and fps text appear in the upper right corner of the display, the HU3 and MDR are both set to the same wireless channel. If the wireless channels of the HU3 and MDR do not match, the message No Host! will appear in the upper left corner of the display replacing the ft and fps text.
- Match the HU3 wireless channel to the MDR:
- Press the Menu soft key. “Channel” will be highlighted. Use the Nav key to move the selection to the right. Change the channel number with the Nav key to match the setting of the MDR.
- The Signal Strength bars will appear. To return to the main menu, press the Nav key left.
- To turn off the power to the unit, press the Power switch for 3 seconds.
-
-
III. Helpful Notes
- To use a blank focus marking ring, turn off the Focus mapping:
- Press the Menu key.
- Select Lens.
- If the focal length and serial number of a lens appears to the right of “Lens”, press Fmap OFF.
- The HU3 is now ready for basic operation. The blank focus marking ring, and iris marking strip can be used to mark lens calibrations.
- Focus mapping eliminates the need to manually mark separate rings for each lens. Data from the lens library is matched to pre-printed focus marking rings. This makes process of lens changing quick and efficient. To load focus data for a lens and select a focus ring:
- Press the Menu key.
- Use the Nav key to select Lens.
- Press Choose.
- Select the lens location (All lenses, My List A…..)
- Select the lens and press OK or the Enter key (the center of the Nav key).
- Set the lens to infinity (as directed) and Enter/Next.
- Press Ring and choose a focus ring with the desired near focus.
- Install the same focus ring on the focus knob.
- The Camera Speed and Shutter angle can be programmed by using the Nav key to select Camera from the Menu screen.
- Press Choose to select camera type.
- Set-up shows the camera speed and shutter angle menu.
- To enable HU3 control of camera speed and shutter, select Yes for Speed, Shutter.
- Use the Nav key to select the Speed, and edit the value on the right.
- Common speeds and shutter angles are available from lists. The List soft key appears when the Nav key selects either the speed or shutter angle value for editing.
- Programming the camera speed and shutter angle is described in detail in section III. The camera speed and shutter angle are displayed in real time in the upper right corner of the display.
- Lens Limits can be set using the three groups of set/reset (s/r) keys. To set a limit, move the motor to the first limit and press the set (s) key. While keeping the s key pressed, move the motor to the second limit and release the s key. The limit is now set and indicated by a lit LED. To remove a limit, press the reset key r.
- The Zoom bargraph indicates the off-limits areas by two lit strips of LED’s. The span of the allowed travel corresponds to the length of the un-lit LED’s.
- Lens limits can be used to lock a motor to a given position. This is done by setting a zero-span, where the beginning and end of the range are the same point. To lock a motor, position the motor to the desired point and press the set and release.
Using the Pre-Printed Scales
The midpoint of each scale is about twice the minimum focus distance. Although the ring can be chosen to cover the entire focus range of the lens, it is often advantageous to choose the ring which covers the
minimum focus required for the actual shooting.
For example, the Summilux 18mm lens has an 18” near focus, matching the Bi ring.
However, if the closest distance required is 3’, only half of the knobs rotation would be used. Choosing the Di ring instead would make the entire rotation of the focus knob available and double the spread of distances, dramatically improving the precision.
Note:
any focus ring can be used with any calibrated lens.
 Increase the “throw” of the focus knob by choosing focus ring
minimum focus.
Increase the “throw” of the focus knob by choosing focus ring
minimum focus.